If you follow our tutorials, you have already known how to use dhtmlxScheduler and dhtmlxGrid with Node.js, a flexible JavaScript platform.
This time we will deal with dhtmlxGantt with Node.js.

You can download the full archive with the final solution from github.
Step 1 – Creating a simple Node.js site
Fortunately, Node.js has a set of ready to use solutions. And we don’t have to write everything from scratch, we will use the ready modules. Express as a web-framework and node-mysql – to work with MySQL. Also, as we are working with dates we need a lib to convert dates to string and back. For this purpose we will need date-format-lite
First of all, let’s create a directory – “gantt-node”, for example, – and install the necessary libraries into it by running the next command:
cd gantt-node
npm install express
npm install mongoskin
npm install date-format-lite
Then we proceed with preparing database – we need to create tables as described here –https://docs.dhtmlx.com/gantt/desktop__howtostart_nodejs.html#step3preparingadatabase
The next step is a creation of the base of our app – “app.js” file in the “scheduler-node” directory – with the following content:
var path = require('path');
//connect to the MySQL
var mysql = require('mysql');
var db = mysql.createConnection({
host : 'localhost',
user : 'sampleDB',
password : 'sampleDB',
database : 'sampleDB'
});
//enable date conversion helpers
require("date-format-lite")
//create express app, use public folder for static files
var app = express();
app.use(express.static(path.join(__dirname, 'public')));
//is necessary for parsing POST request
app.use(express.bodyParser());
app.listen(3000);
Don’t forget to change the DB parameters to those you need.
Due to Express, the whole app fit into a couple of lines. It doesn’t execute anything extraordinary and just serves static files from the “public” directory.
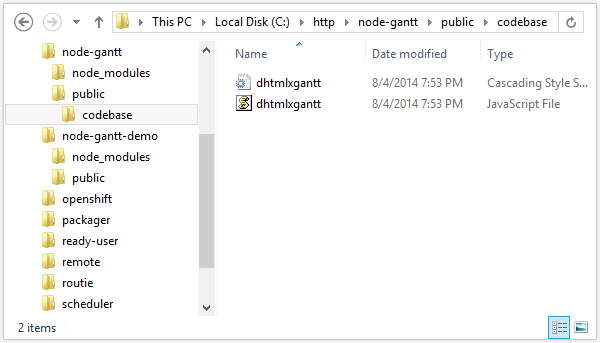
Create “public” directory and unpack the folder “codebase” from the Gantt’s package into it. The whole files’ structure should look as follows:
In the “public” directory let’s create “index.html” file – the main page where we’ll place a calendar.
<head>
<meta http-equiv="Content-type" content="text/html; charset=utf-8">
</head>
<script src="./codebase/dhtmlxgantt.js" type="text/javascript" charset="utf-8"></script>
<link rel="stylesheet" href="./codebase/dhtmlxgantt.css" type="text/css" charset="utf-8">
<style type="text/css">
html, body{ height:100%; padding:0px; margin:0px; overflow: hidden;}
</style>
<body>
<div id="gantt_here" style='width:100%; height:100%;'></div>
<script type="text/javascript">
gantt.config.xml_date = "%Y-%m-%d %H:%i:%s";
gantt.init("gantt_here");
gantt.load("/data");
var dp = new dataProcessor("/data");
dp.init(gantt);
dp.setTransactionMode("POST", false);
</script>
</body>
So, there is no need in more HTML code for the Gantt. There are two includes for js and css files of Gantt. After it code to init gantt comes. Code contains instructions for data loading and data saving, for which we still don’t have a server side code, we will add it later.
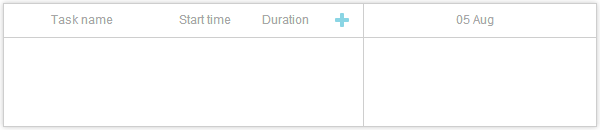
To see whether the app works right, we may start the node.js server and open https://localhost:3000 address in a browser. If everything is done correctly, we will see an empty gantt. To start nodejs server, run “nodejs app.js” command.
Step 2 – Loading events
We’ll start with loading some random data in the database:
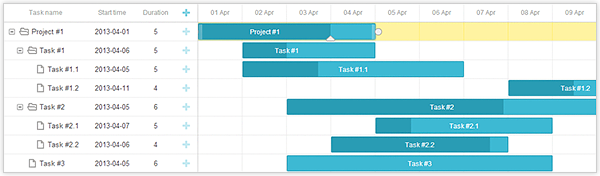
INSERT INTO `gantt_tasks` VALUES ('2', 'Task #1', '2013-04-06 00:00:00', '4', '0.5', '10', '1');
INSERT INTO `gantt_tasks` VALUES ('3', 'Task #2', '2013-04-05 00:00:00', '6', '0.7', '20', '1');
INSERT INTO `gantt_tasks` VALUES ('4', 'Task #3', '2013-04-07 00:00:00', '2', '0', '30', '1');
INSERT INTO `gantt_tasks` VALUES ('5', 'Task #1.1', '2013-04-05 00:00:00', '5', '0.34', '10', '2');
INSERT INTO `gantt_tasks` VALUES ('6', 'Task #1.2', '2013-04-11 13:22:17', '4', '0.491477', '20', '2');
INSERT INTO `gantt_tasks` VALUES ('7', 'Task #2.1', '2013-04-07 00:00:00', '5', '0.2', '10', '3');
INSERT INTO `gantt_tasks` VALUES ('8', 'Task #2.2', '2013-04-06 00:00:00', '4', '0.9', '20', '3');
after that we can add a handler for data loading in app.js
db.query("SELECT * FROM gantt_tasks", function(err, rows){
if (err) console.log(err);
db.query("SELECT * FROM gantt_links", function(err, links){
if (err) console.log(err);
for (var i = 0; i < rows.length; i++){
rows[i].start_date = rows[i].start_date.format("YYYY-MM-DD");
rows[i].open = true;
}
res.send({ data:rows, collections: { links : links } });
});
});
});
“/data” handler will be used to load data into the gantt. Here we select all records from tasks and links table, and send them to the client-side as json structure.
NOTE: before sending the records we convert start_date parameter to the string in Year-month-day format. Also, we have set “open” property for each item. It will force gantt to have all branches opened after data loading.
After restarting the server and opening in browser http://localhost:3000 – there will be our gantt with tasks inside.
Step 3 – Adding / deleting / editing
Let’s go to the server code and add one more handler to app.js:
var data = req.body;
var mode = data["!nativeeditor_status"];
var sid = data.id;
var tid = sid;
function update_response(err, result){
if (err){
console.log(err);
mode = "error";
}
else if (mode == "inserted")
tid = result.insertId;
res.setHeader("Content-Type","text/xml");
res.send("<data><action type='"+mode+"' sid='"+sid+"' tid='"+tid+"'/></data>");
}
if (req.query.gantt_mode == "links"){
//save links
if (mode == "deleted")
db.query("DELETE FROM gantt_links WHERE id = ?", [sid], update_response);
else {
var source = data.source;
var target = data.target;
var type = data.type;
if (mode == "inserted")
db.query("INSERT INTO gantt_links(source, target, type) VALUES (?,?,?)",
[source, target, type],
update_response);
else
res.send("Not supported operation");
}
} else {
//save data
if (mode == "deleted")
db.query("DELETE FROM gantt_tasks WHERE id = ?", [sid], update_response);
else {
var text = data.text;
var start_date = data.start_date.date("YYYY-MM-DD");
var duration = data.duration;
var progress = data.progress;
var parent = data.parent;
if (mode == "updated")
db.query("UPDATE gantt_tasks SET text = ?, start_date = ?, duration = ?, progress = ?, parent = ? WHERE id = ?",
[text, start_date, duration, progress, parent, sid],
update_response);
else if (mode == "inserted")
db.query("INSERT INTO gantt_tasks(text, start_date, duration, progress, parent) VALUES (?,?,?,?,?)",
[text, start_date, duration, progress, parent],
update_response);
else
res.send("Not supported operation");
}
}
});
Here we use “app.post”, as all saving operations use POST queries. The first part of the code shows the type of operation and removes all the technical parameters from an incoming query to get an object that can be saved in the database.
Then, according to the operation type, we carry out the necessary sql query. We have two major blocks – data operations for tasks and data operations for links. In each block we have separate sql code for each type of operation (adding/saving/deleting). As the operations with database are asynchronous, we pass the specified earlier callback function “update_response” as the last parameter. The client side expects to get the confirmation of saving operation or an error message – this is what the “update_response” function is responsible for. It generates an XML response in the necessary format and sends it to the client side. (Details of the format you may learn from the documentation ). If we add a new record, this function also includes ID, generated by MySQL for the new record, into the response to update the element’s id on the client’s side, too.
If we restart the server and open http://localhost:3000 in browser again, we’ll get a gantt with tasks. Clicking on “Add ” button will add new task to the gantt. Double-clicking or dragging the task will allow modifying the task properties or deleting the task. The cool feature is the availability of all the changes even after reloading the page as they’re automatically saved in database.
What is the result?
The server solution is quite simple and can be easily customized. It won’t be difficult to add validation or some kind of data formatting before loading. As Node.js allows using JavaScript on server side, we use the same concepts on both client side and server side, which definitely makes result code more compact and stable. But it also stands to mention that dhtmlxGantt is flexible enough, and integration with any other server side platform will not require much of coding.